How To Connect To iTunes When iPad Is Disabled? [3 Easy Fixes]
If you get the “iPad is disabled; connect to iTunes” message on your iPad screen, you probably have entered the wrong password too many times. No worries; you can try one of the following ways to fix the issue.
The first involves connecting your iPad to your computer. Then you will have to launch iTunes and put the iPad into recovery mode, eventually restoring it. In the second approach, you have to download software and then take a few more steps to restore the iPad. Finally, you can restore an iPad using iCloud.com.
That said, we’ve outlined the article, showing all these approaches in detail. Hopefully, one of the methods will get your iPad up and running again. Keep reading to find out more!
How To Connect To iTunes When iPad Is Disabled?
As we have just mentioned, there are several ways to connect to iTunes when the iPad is disabled, and some ways to restore it without relying on iTunes.
In this section, We’ll explore each of these methods, providing you with the necessary information to choose the one that best suits your situation and preferences.
Method-1 Factory Reset
This method can be applied to all iPads, irrespective of generation, year, or iOS version. The only thing to ensure is that the iPad must have a physical home button.
The procedure for the factory reset is slightly different if the device does not have a physical home button.
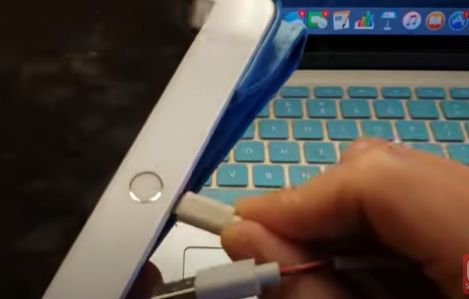
- Step 1: Hook the iPad up with the computer
Hook up the iPad to the computer using the lightning charging cable that came with your iPad
- Step 2: For Windows, download iTunes
If you have a Windows computer, you need to download iTunes. On the other hand, Mac has it already preloaded, so you do not have to be worried about it.
- Step 3: Enter the recovery mode screen
So the iPad is connected to the computer, and you have downloaded iTunes. Now, press and hold the home button and the power button at the same time.
Make sure to continue holding both buttons until you see the Connect to iTunes screen.

Once you see the screen below, go ahead to the next step.
Note: This step is slightly different for iPads without the home button. In that case, press and hold the power and volume down buttons and wait for the power off slider and slide it and shut down. That’s not the end, Keep holding the power button until you see the recovery screen.

- Step 4: Hit Restore on the computer screen
Once the iTunes screen appears, an error message will pop up on your computer screen saying there is a problem with the iPad that requires updating or restoring.

- Step 4: Click on Restore
Out of the two options, click on restore, not on update. Once you hit Restore, you will see another window appear on the computer screen saying, Are you sure you want to restore the iPad to its factory settings? Click on ” Restore and Update”

As soon as you click on the icon, your iPad will start rebooting. It will take at least 10 minutes to a maximum of 30 minutes.

Once everything is done, you will see another pop up message on the computer screen saying your iPad has been restored to factory settings and it’s restarting.

Note: When you perform a factory reset, you will lose existing data like photos, videos, emails, or important passwords, and it will restore to factory defaults. If you have important files and data, make sure you have backups on iCloud or iTunes.
Method 2: Using 4UKey
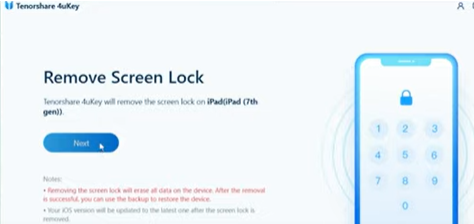
In Addition to a factory reset, in which you need backups to secure the existing data. You can use third party software like 4uKey to remove the passcode from the iPad. We are going to show you the step by step process using 4uKey to unlock your iPad.
Step 1: Download and open the 4uKey software on your computer. Connect your iPad to the computer.

Launch and open 4uKey
Start 2: After launching the software, click on ‘’Start’’.

Connect the iPod to the computer
Step 3: Once you click Start, another window will appear with the ‘next’ icon. Now Click on that.
Click Next
Step 3: After clicking on the ”Next” icon, the next window will have an option to navigate your iPad model. On this screen, you will find detailed instructions on how to put it into recovery mode.
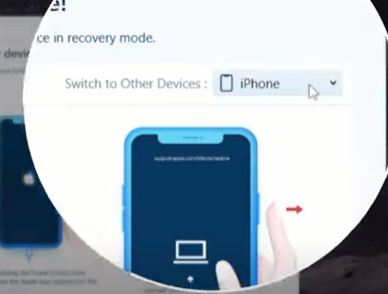
Step 4: On the iPad with the home button, press and hold the power and home buttons at the same time. Keep holding them until you see the recovery mode screen.
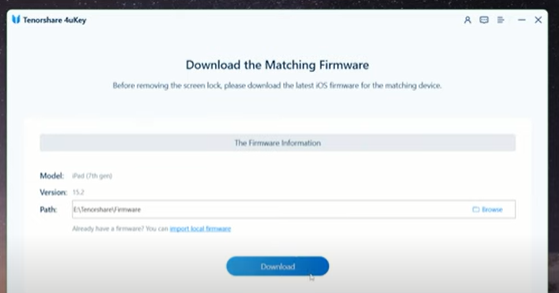
Step 5: Once you have the recovery mode screen, 4uKey will prepare the firmware, and you will have a download icon on the computer screen . Simply, click on the download.
Step 6: After the download, you will have an option called Start Remove. By clicking on the icon, you can start unlocking.
Method 3: Restore iPad without iTunes
Here you have two options: web versions of iCloud.com and an app version for iPad. We are going to demonstrate using iCloud.com to perform an iPad restore.
Step 1: Visit iCloud.com with your Apple ID credentials in any web browser.

Step 2: You want to make sure that Find My iPad is turned on because this feature will be used to get your iPad back. To enable it, go to Settings, then iCloud, and enable Find My iPad.
Step 2: Once you have logged in, from the options, simply hit My iPad, and you will be directed to the next window with an option called ”All Devices” By clicking on it, you can simply choose your device.

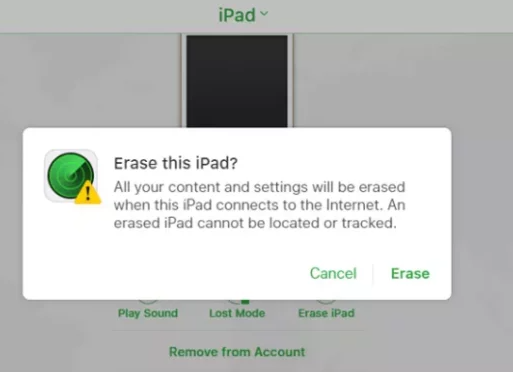
Step 3: Then you will have to hit the ‘’erase this iPad’’ option. Hit and erase your iPad to restore.
FAQs
By now, we have covered three useful methods for restoring an iPad. Maybe you were able to fix it. Here are some frequently asked questions related to the discussion.
What to do if the iPad won’t enter recovery mode?
You need to check if the home and power buttons are functioning correctly. In addition, you can try using a different Lightning cable and connecting your iPad to a different computer. If nothing really works, contact Apple support.
What can you do to prevent your iPad from being disabled?
You can make the unlocking procedure easier. If your iPad supports Touch ID or Face ID, enable them. Other than that, you can save your password in some other place or use a password manager app to secure it.
Final Words
So hopefully, you have successfully solved the issue. We have tried to cover all the methods in detail. There are many other approaches you can try.
However, you do not have to try any other way than the ones we have described here. If you use third party software, use the best one. 4uKey is easy to use.
Finally, follow Method 3, which shows how to restore without iTunes. One last piece of advice: make yourself careful to prevent your iPhone from being disabled.